Wednesday, August 5, 2009

How to make Binoculars with Toilet paper tubes


Today we made binoculars. Here are the things you'll need. Fun paper, paper cutter, double sided tape, two toilet paper tubes, Crop a dile*, two eyelets*, Scissors and ribion. * if you don't have these things you don't HAVE to have them, just skip that part.
Measure the tubes and cut to the length of the tubes. I used a 12x12 paper. Then with the double sided tape you'll put it on all edged and then in the middle.. if you look closely you can see how I've done it below. Take tubes and line up with paper, place down and roll evenly, once you get so that they are fairly close together you'll want to take some more tape and place between them to keep the tubes close to one another.Then you will take the crop a dile and putting a hole on each side of the Binoculars and then putting the eyelets in place. This will help the ribbon from ripping the tubes and from coming apart. Next cut ribbon to size, put through eyelet and tie a knot... You now have your own Binoculars!!! When dealing with smaller children you MUST keep an eye as the ribbon and eyelets could be a choking hazards. With old kids they can help make them! Have fun! Would love to know if you try it out!

Wednesday, June 17, 2009

Fun with Puzzles...


I found this great puzzle at Micheal's craft store... I got the fun of painting it and Gabriel got the fun of playing with it. I painted the spot where each animal goes to help identify where each one should go. Toddlers have a hard enough time trying to get the shape to fit why make it harder then it needs to be. It give toddlers confidence to be able to finish a project.

Thursday, June 4, 2009

A special something for a Special Girl!!!


My Niece Turned 5 last May 23rd. She is an amazing girl. She is a mini mama, toting around a baby doll with her where ever she goes. She is going to make the worlds greatest mama someday, all thanks to her wonderful Mother Kathrine! Is Kenzie the cutest!
For her birthday I decided to make her an apron and got a few cooking things to go with it; mixing bowl, spatula, oven mitt, measuring cups and cookie mix. She will need her mothers help but I have a feeling that she is going to love it!

Here is a picture of Blake showing off her cousins apron. It is a bit big, even for Blake (who is 7), but that will give her room to grow and enjoy it longer.

Nick The Spider....

About a month ago I noticed a spider of great size in the corner of my dinning room. Being super wacky about spiders I thought, if he moves, he's a goner. The spider stayed put, and became a fixture of the dinning room. Catching the bugs that fly in from outside, he was a keeper. One morning at breakfast we as a family voted to name our spider. Blake was the first with a name and NICK it was!
This morning Nick was gone. We were sad. Later this evening I found Nick. He had found a new spot by the front door. I was happy to share with the family once I had found him. I sure hope Nick doesn't invite any of his friends in, I don't think I can handle any other spiders!

I am hoping Nick will stick around long enough to have Blake write a story about him. I think it would be a great Summer project. I will update you on her story in a few weeks.

Monday, May 4, 2009

LOST IT ALL....


My laptop broke in half and I lost EVERYTHING...... all pictures... all documents... all videos... I am sooo sad!!!

REMEMBER TO BACK UP what you have!!!!! Laptops are great to be able to carry with you on the go.. but like my favorite movie Duplex with Ben Stiller they can easily be "trashed".

Back to blogging soon, once I get used to this new laptop.

Thursday, April 16, 2009

Daisy Chain


Today we went to the park and decided to sit down in the grass to admire what a wonderful day it was. As most people do we started pulling blades of grass until I noticed a big patch of daisies. I remembered back in the day when I used to make daisy chains. I challenged my memory to see if I could still make one. What do ya know I still can! Something fun to do while taking a relaxing break and a neat little souvenir of the adventure at the park. I found this neat little demo on how to make them. Enjoy!

Tuesday, April 7, 2009

1000 Cranes

"A crane standing amidst a flock of chickens"

My nephews where having a cultural fair a few weeks back and I helped make some of the thousand cranes. My S. daughter helped make a few. It took her a few tries but she got it and took off with it. Here is a link on how to fold a paper crane http://monkey.org/~aidan/origami/crane/ . Give a few tries before you give up, patience is key!

Saturday, April 4, 2009

Thank you card with love


When I was little and would get something from a relative or friend I would have to write a thank you letter. At the time of coarse I didn't care to do it. Now I see the importance of it! My S. Daughter had received a very nice hoodie from our Aunt and I wanted her to write a thank you card. Instead of a store bought or a piece of paper I had her make the card. She had so much fun picking out the design, stamps and colors. I liked it so much that I made one too! We also made the evelopes to go along with the cards. She learned how to use a heat gun, embossing powder and the effects they have together. She already knows how to use mono adhesive, fiskers cutting tool, crop-a-dile and plenty of other crafty tools, at the new age of 7! She is one of my favorite crafting partners when she comes over.

Monday, March 30, 2009

Birthday TIME!!!!

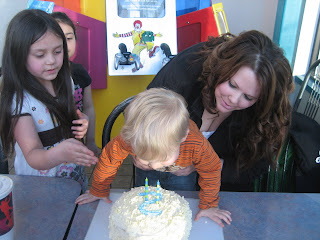
Today is my Son's birthday. He Turned TWO!!!!I made the most delicious Heavenly white Chocolate Cake!!! I brought it to Mcdonalds for the party we had yesterday. Did you know that in some of the Mcdonalds you can reserve a room? I paid $35 and some change to get 10 happy meals and that paid for the room another cake (shhh... it wasn't as good as mine!!) favors and little bowls of ice cream! What a great time we had and sooo little money spent! I also liked it because he could go play and was in my sight the whole time and yet I could converse with my adult family. I have to say that we may end up doing this AGAIN!!!!

Tuesday, March 24, 2009

Something other then Sand!

My mother used to do this with us and I would like to pass it on to the rest of you!
Instead of a sand pit and possible cat poo as a hidden treasure try bird seed. It is clean, non toxic and fairly easy to clean. I like to put it in a tub and then hid little treasures, like hot wheels or little blocks. The only thing I forgot to do this last time was put a blanket down.. it make clean up SO much easier!

Monday, March 23, 2009

Lucky Me!

I was lucky enough to get this Kreativ Blogger award. Part of the game is to name 7 things about your self and name seven other people that deserve the same award.

Seven things about me:
1. I like to vacuum, but can't stand wrapping up the cord
2. I don't mind doing dishes but I can't stand putting the clean ones away
3. I love arts and crafts
4. I've been thinking about doing another blog of just MY crafts like my sister.. what do you think? should I?
5. I love cooking and am pretty good at baking.
6. I love rabbits so much I got one tattooed on my lower back.. It has the Jesus fish symbol hidden in the vines
7. I didn't get my ears pierced until I was 24.

Seven people that deserve this award:
1. Tam Hess @ Art In Flight * This is my wonderful talented sister that I learned all of my art from. She is the true reason I have come out some what normal in life! Love you bunches sissy!

2. Diane @ Artstanding Stranger

3. Crystal Bannin @ Queen of Torts

4. Cindy Shepard @ Rowdy Grandma and cyndali *Rowdy Grandma is the same kind of concept as my blog... She rocks!

5. Rebecca Estate @ The Copper Brick Road- our Path to Penny Pinching

6. Lisa @ Lucid Moon Studio

7. Shelliebellie @ STUFF by me

Coffee Filter, Food Coloring, Clothes pin and a pipe cleaner


May the wings of the butterfly kiss the sun
And find your shoulder to light on,
To bring you luck, happiness and riches
Today, tomorrow and beyond.
~Irish Blessing


My S. Daughter and I had fun playing around with food coloring and coffee filters. A dab of food coloring goes a long way! We made butterflies out of the colorful coffee filter. It didn't take long at all for them to dry. I had gotten the clothes pins from the craft store. These pins are a bit smaller then the normal size ones. I took a pipe cleaner and cut it in half and then bent the half in half and curled the ends. Wa La! DONE! You could put some googly eyes on for added flare. I also made another one but didn't scrunch up the middle to make it a butterfly. I liked it too much as it was.

Sunday, March 1, 2009

Clothes Line of Photos


We like to go to our local mall and take those both photos. It has been a fun way to watch the kids grow. I never quite knew just what to do with them. My dear sister has a book of them. It very neat. Anytime we do it we give her the other set. I wanted to do something different. So I came up with this idea of hanging them on a clothes line with clothes pins. The line is hanging off two shelf supports. I used the smaller clothes pins, so it would look more even. Both my son and daughter love looking at themselves and planning the next set of pictures out.

Thursday, February 26, 2009

CHOPSTICKS


Kids tend to copy what you do, and what a great thing, when it's a good thing your doing. We where sitting down to have a small meal of our favorite pot sticker and I handed out chop sticks. I didn't think to give it to my son until he did the point and grunt. I handed him his own pair and he did a great job of poking the pot sticker with the chop sticks. You could see his mind working, he tried using both in one hand and then gave up and used one in each hand. I will be sure to have a pair for him when we sit down to our next chopstick meal. Watch out silliness can occur!

Tuesday, February 24, 2009

Been gone...

I've taken a small break from posting the last 10 days. I am hoping to get back on track tonight.. Stay tuned... While I've been on break, I've had lots of fun with kid friendly crafts.. I can't wait to share!

Sunday, February 15, 2009

Hop on Pop Valentine


For my husband this year Gabriel and I made a shirt for him that says HOP ON POP. It sums up how they play together. I bought a shirt at the craft store and acrylic paint, the kind you use on a canvas. I had my brother in law hold Gabriel's feet and then I painted and helped place his feet in the right spot. I reapplied a new coat of paint before each new print. I then brushed on the words. For the front breast emblem I used Gabriel's initials and the date with out any dashes to separate the month, day and year to add a different touch. The paint drys very fast and stays on through the wash.

Saturday, February 14, 2009

LOVE BUG


In the spirit of Valentines day I wanted to bring you the LOVE BUG today. I had a bunch of egg cartons left over and wanted to have Gabriel do some sort of craft with it. Being an artist myself I was so excited to see him hold his paint brush the right way. He had a great time painting something other then just paper. I helped after the paint was dry with some pipe cleaners, googly eyes and a button.

Friday, February 13, 2009

Will you.........

Be My Valentine???

With Valentines being so close we made little Valentines to send out to family. With a little patience, stamp pad, paper, scissors, stickers, color photo copier/printer and some mono adhesive we made cute little Valentines. I suggest using a washable ink pad!!! With my guidance I helped him make a heart with his pointers and thumbs. Then I used my handy color copier/printer and did a copy of his hands and then doubled up to make more hands per print out. After I got the right amount it took some time to cut out each heart hand print, but well worth it in the end. I then added a few things here and there and WA-LA, we made Valentines. I expect lots more help from the little one next year! :) I wanted to do more but run out of time. I hope to have the Valentine We are doing for my husband up tomorrow. Stay tuned!

Wednesday, February 11, 2009

Home Made Playdough


We had lots of fun with playdough today! We made it at home... Here is a very very easy recipe:


Uncooked Playdough (salt and flour)

1/4 cup salt
1 cup flour
1/4 cup water
I made half the recipe for a smaller amount. It was the perfect amount for him.


Have your child mix the flour and salt in a bowl then add water. Knead and squeeze the dough to make a clay consistency. You may need to add more water

Thursday, February 5, 2009

PAINT, what a horribly great mess!!!


"The only time I feel alive is when I'm painting." - Vincent Van Gogh
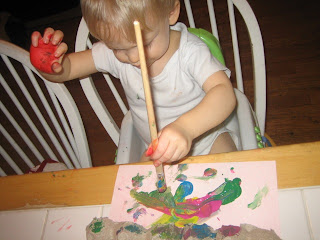
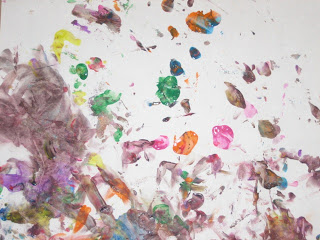
Today I was at the wonderful target and found a pack of 10 finger paints for less then five bucks! Finger paint and a almost 2 year old, you can imagine the mess in your head! However as a painter my self I couldn't resist. I took our kitchen table away from the wall, covered it with brown wrapping paper I got from the dollar store and places him up on it. As an artist I put the colors on a paper plate, I suppose thinking he would just use one color at a time. I was wrong, he mushed them all together and man what a mess, BUT WHAT FUN!!! He got a kick out of mushing the paint in his hands and mixing the colors. When he was done with that he decided it would be fun to see what it would look like on his tummy. After the mess was created I stuck him in the bath and like magic it all was gone before he was even done playing. It was a very easy clean up and we will be doing this a lot more!

Wednesday, February 4, 2009

Side walk chalk...


My sister gave us a big pack of side walk chalk. It has been dry the last few days, amazingly enough for Oregon. We went out side and swept off a small area to have a little chalk fun. It was cold so we didn't get to do it for long. I like that we did it when rain will surely wash it away soon.